
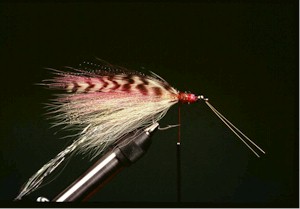
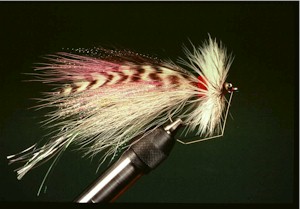
SPS FLASHTAIL WHISTLER
Written and Photographed
by Dan Blanton
Tying Instructions
 |
 |
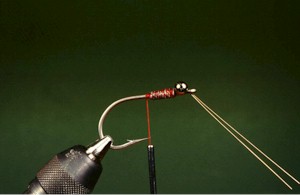
| 1. Place your hook in the vise (barbed or de-barbed), and wrap the thread to just in front of the hook-point. The entire fly will be tied from the hook point forward to enhance dipping and diving action.2. Now take a length of single strand wire about six inches long and double it forming a closed needle eye at one end. Bend a 45 degree angle in the doubled end about 3/8 inch long, place the bent end up through the hook eye, wrap it securely to the top of the hook shank and cement. Now bend the two single wire legs hanging down through the hook-eye, out away from the eye to provide tying clearance. You’ll shape them properly after the fly is completed.
3. Place the bead-chain eyes on top of the hook shank, right against the hook eye and figure-8 wrap them securely to the shank and cement. 4. You now wrap ten turns of .030 lead wire over the hook shank and the wire guard. The last turn of lead should be against the bead eyes. |
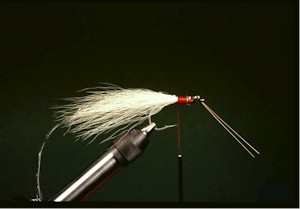
5. Move your thread back to just in front of the hook point and tie in a medium bunch of white bucktail right on top of the hook shank. Trim the stubs forming a slight taper to the bead eyes and wrap all stubs tightly down and glue. Do not let the hair roll around to the far hook-side. All the remaining tail/wing materials including the flashtail will be positioned directly on top, and will be tied in just in front of the hook point. Do not cheat forward or backward on the shank from this tie-in point! Note: it helps to prevent rolling the materials to the far side, it you take a couple of loose turns of thread around the material just in front of your fingers holding it, and then apply pressure by pulling the thread straight downward.6. You now tie on the flashtail: cut 25 strands each of silver and pearl Flashabou from a bundle, at least six inches long, wetting each bunch with saliva or water, making the strands easier to handle. Place both bunches together and place them directly on top of the first bunch of white bucktail, wrap down and cement. You don’t cut the flashtail to length until after the entire fly is completed. At that time cut the tail so at least an inch to an inch-and-a-half extends beyond the hair tail/wing. |
 |
 |
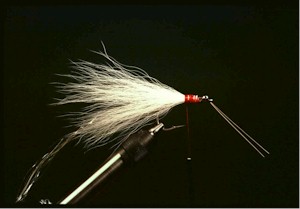
7. Now tie on another medium bunch of white bucktail directly on top of the flashtail, the same length as the first bunch of bucktail, trimming stubs to a taper (these stubs will form a foundation over which you’ll wrap the hackle collar). If the tail/wing is not full enough, you many wish to add another bunch of white bucktail on top of the second bunch. |
8. Now cut a medium bunch of hot pink (cerise) bucktail and place in directly on top of the preceding white bucktail, taper stubs, wrap and cement. |
 |
 |
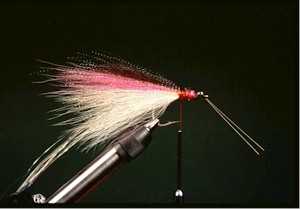
| 9. Now place a small bunch of dark purple bucktail (from the back of a purple bucktail) directly on top of the pink hair. Place 10 to 15 strands of purple Crystal Flash on top of the hair, trim, wrap and cement all.10. Cut 10 strands of pink Crystal Flash and tie in as shoulder flash over the pink hair.
11. You now tie in some side flash consisting of 10 strands of multi-colored (rainbow) Crystal Flash, about 3/4 length of the tail/wing. Use a fine-toothed comb to spread the side flash. |
12. Now take a couple of large, grizzly neck hackles which you should have already prepared and sized to 3/4 length of the tail/wing (A tip: don’t strip the barbs off the quill at the tie-in point. Cut the hackles there, straight across, forming a V in the hackle at that point. Coat about a 1/4 inch of the V with Flex-cement. Doing this will provide a sturdy, flexible tie-in point which prevents the hackle from rolling or turning), and tie one on along each side of the tail/wing. |
 |
 |
13. A body collar consisting of only two turns of medium red chenille is now tied on at the hook point position. Apply a liberal amount of cement in the area before wrapping the chenille. Remember – this is just a collar, not a body! It simulates red gills. |
14. You now tie in two, long webby saddle or neck hackles (saddles preferred), just in front of the red collar. Place one hackle on top, the other slightly forward and on the side nearest you. Semi-Palmer the front hackle to just short of the bead eyes, followed by the second hackle. These two hackles form a wide collar. Now face the white hackles with a large, webby grizzly hackle, taking about five turns.15. Finish off the fly’s head by taking several turns of thread in back of and then finishing off in front of the bead eyes. Cement. 16. Finish the fly by trimming the flashtail to size and shaping the wire snag guard. The two legs of the guard should be bent back toward the hook point, stopping about an 1/4 inch in front. Another bend is put into the wire at that point so the two legs now run parallel to the point and shank. Now spread the legs into a V with one leg positioned on each side of the hook point as shown. You now have a completed SPS Flashtail Whistler with double-wire snage guard. |