
There are several methods of making and attaching loops to fly lines. Most work. Some are better than others. Probably the oldest and most used loop connection is the wrapped or “served” loop, which is formed by stripping the coating off the fly line, doubling back the core braid onto the fly line itself to form a loop and then wrapping it to the line with thread from a twirling fly tying bobbin, finally coating the wraps with a flexible cement. Some anglers don’t even bother stripping off the line-coating. Both techniques produce a friction-held loop and it works for small game. But when used for big game, it can fail due to slippage or from the loop breaking. The core of most fly lines rarely exceeds 30-pound-test and is usually weaker.
This method was improved by Russ Peak years ago when he started using the “Rush Peak Sewn Splice”. Russ would either double back the core as described above, or would lay a loop of heavier nylon or Dacron over the line’s end and then would stitch through all with a needle and a doubled length of nylon fly tying thread. He made sure the needle passed dead center through both legs of the loop and the fly line core with each stitch. It only took a few stitches to make one of the smallest yet strongest line loops ever. The splice was finished by wrapping several layers of thread over the stitched area and then coated with flexible cement. I used this technique for years to form line loops. The downside to the sewn loop was that it was time-consuming and didn’t work as well with some of the new braided mono-core fly lines.
Others found success with just doubling over the fly line to form a loop, securing it with a couple of monofilament trap nail knots. This one held vise-like, but because of its diameter, went through the guides like a wench line loop. It was a good “field expedience loop”, though, if you needed to place a loop in a line quickly and didn’t have other materials to work with.
The Best Loop For Fly Lines Today
For most line sizes, myself and many other bluewater fly anglers, prefer making leader, backing, shooting head and shooting line loops from 50-pound braided mono. The 50-pound braid affords the greatest strength, abrasion resistance and will still slip cleanly and quietly through the guides without hinging.
Cortland and Gudebrod each make a quality braided monofilament. I personally prefer Gudebrod because it has a tighter braid. You can purchase Cortland braided mono in both 30- and 50-pound test from just about any Cortland pro shop. Gudebrod comes in 35- and 50-pound test, and is easily obtained from a variety of marine tackle catalogs or you can order it from outfitters like World Wide Sportsman, San Jose Fly Shop and Marriott’s.
Making The Braided Mono Loop
Making braided loops is not complicated. In fact they are easier and faster to make and install than any of the previously mentioned techniques.
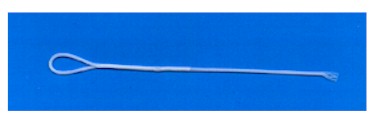
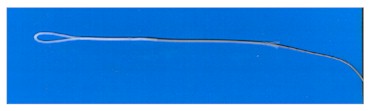
As a rule-of-thumb, small diameter (about an inch) loops are used as leader and shooting head attaching loops, larger (6- to 8-inch) diameter loops are used for fly line backing and shooting line attaching loops. The larger loop facilitates the passing through of a coiled shooting head, full line or a fly reel, which expedites fly line or shooting line changes.
There are a couple of ways to make a loop in braided mono. There is what we call a single-catch loop and a double-catch loop. Trust me, use only the double-catch loop. It will not slip. Single catch loops frequently fail.
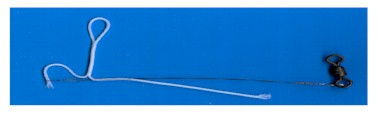
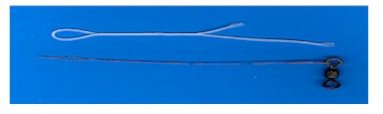
In order to make a braided fly line loop you will need a splicing tool which is easily fashioned from a 12- to 14-inch length of #3 to #5 single strand wire. Fold the wire in half, forming a tight needle point at the apex of the bend. Shaping the needle point in the fashion of a fly tier’s bobbin threader makes the perfect splicing tool. At the opposite end of the wire needle, Haywire twist on a large barrel swivel, something to grab hold of.
You will also need a large, tapered bodkin or needle to be used to open the end of the braided loop sleeve, into which the end of the fly line or shooting line will be inserted using the “inch worm” method, inching the line into the hollow core of the braided mono until it enters the core of the inner tag braid (see illustrations).
To form a small diameter loop for leaders and shooting heads, you’ll need a length of braided mono 12 inches long. Larger diameter loops require a length about 30 inches long. The reason for this extra length is to provide a sleeve that will slip over the fly line end at least 8 inches. Because the loop sleeve grips the fly line tightly via the Chinese Finger Trap principle, you probably could get by with just three or four inches of sleeve over the line. In my experience, however, particularly with mono-core fly lines or thinly coated shooting lines, more sleeve length means better gripping with less chance of failure. Some folks use two or more trap nail knots to secure the braided loop to the fly line and some go further by coating the entire loop sleeve with Plyobond or other flexible cement. Use only one trap nail knot where the line enters the sleeve and only coat the single knot and a small area where the fly line enters the inner core braid. Coating the entire sleeve negates the finger trap principle which is what holds the loop to the line. Any additional nail knots are overkill.
The following is how to make a braided mono loop using a wire needle as described.
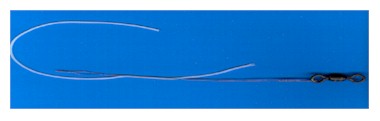
Step One:
Start (right-handers) by inserting the splicing needle into the length of braided mono about 1-1/2 to 2 inches from the right hand end as it lays in front of you. Push the needle into the braid about 1-1/2 inches toward the long end.
Step Two:
Push the needle through the wall of the braid and then insert the end of the long end of the braided mono into the needle opening. Now pull the long end into the core of the braid and continue pulling until you have pulled it completely through and back out of the braid’s core.
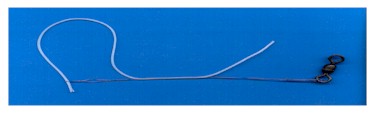
Step 2a:
Continue to pull the long end through the core until it is properly sized.
Step 3:
Once you have the size loop size you desire. You will now have the 1-1/2 to 2-inch tag end sticking out from the side of the point where the long end comes out of the braided mono core.
Re-insert the needle at a point about 1 to 1-1/2 inches below the short tag and run it into the core toward the tag to a point just below where the tag protrudes. Push the needle through the braid wall. Insert the tag end into the needle opening and then pull the tag back inside the braid’s core and back out through the wall, following the needle.
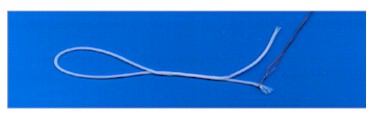
Step 4 & 4a:
You will now have a shorter tag remaining outside of the braid. Pull on that tag just a little to shorten it and then cut it off flush with the braid’s wall. Pull on the loop and standing length, and the tag you just cut off will pull up inside the braid’s core. Run your fingers over the entire splice to smooth and straighten it.
Step five:
Insert the end of the fly line, shooting head (leader or shooting line end), or shooting line into the braided mono core and inch worm it all the way until it enters the core of the buried tag about an 8th inch.

Step six:
Now trap the braided sleeve to the line using a 10- to 12-turn nail knot just above where the line enters the braided core, using 10- to 12-pound-test mono. Trim the tag ends of the braid close to the nail knot. Coat the nail knot and the area were the end of the line enters the tag core with flexible cement such as Plyobond or Loop knot dressing.
Braided mono loops are the easiest to make and install of all the previous methods. No other line loop is as strong. Made properly they will slip through the guides like ladyfish slime, will hold the largest tarpon or billfish, and will make connecting fly lines to backing, shooting heads to shooting line and leader butts to fly lines easier and more efficient than ever before.