Tying Instructions
Tying Instructions
|
|
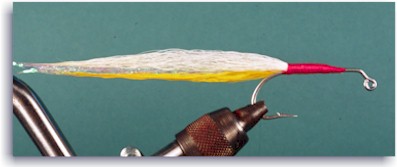
| Step 1. Place a 1 to 3/0 Eagle Claw EC 413, 60 degree jig hook in the vise as you would a normal J hook. Remember the fly will ride hook point up so dark tail and wing materials will be tied on first. Tie in a small amount of yellow bucktail followed by a few strands of Flashabou or other flash material, followed by a larger portion of white bucktail. Wrap all down tightly with red tying thread. Form the body with red tying thread. No need to cement the thread since the entire thread area of the fly with be covered with epoxy. Remember, this is a fly "style" and can be tied in myriad colors and combinations of colors and materials. For example, saddle hackles or neck hackles can be use for a tail and they can be combined with natural or synthetic fibers. |
|
|
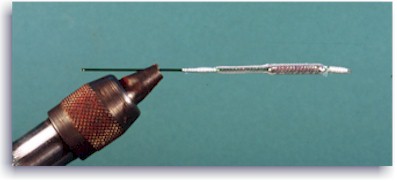
| Step 2. Clamp a 3-inch piece of florist's wire in the vise as shown and wrap it with .035 lead wire. Here's the formula for the number of lead wraps using the EC413 jig hook: size 1 and 2 use 12 wraps; size 1/0 use 14 wraps; sizes 2/0 and 3/0 use 16 wraps. Leave a 3/8-inch section of wire exposed at one end. Next slide on a length of small, pearl Mylar tubing over the lead wire. Tie off the tubing at both ends using white thread. Stretch the front end of the tubing (long end) to force air from the tubing before securing with thread. |
|
|
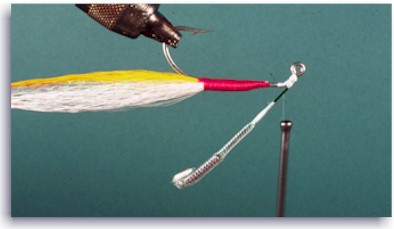
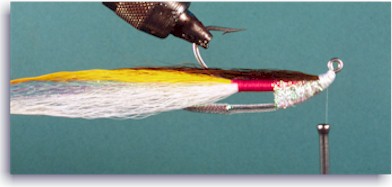
| Step 3: Bend the end of the florist's wire (short side) up over the lead wire. Leave plenty of Mylar length on the long side, as this will represent the gut section of the baitfish. Place the hook in the vise so the hook points up. Now size the length of the wire so the lead wraps begin just under the barb and extend beyond the bend. This placement is key to the fly's unique action. Cut the long end of the wire to the correct length and tie it to the 60-degree bend as shown. |
|
|
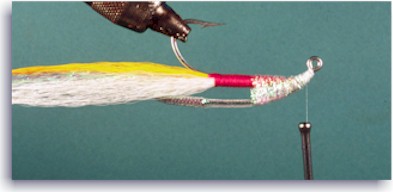
| Step 4: Bend the wire to form the shape of the baitfish (deep for a threadfin shad, less deep for an anchovy). Next tie 10 to 15 strands of pearl Krystal Flash near the eye using a maximum of 10 wraps of white thread. Trim excess and then wrap the material around the hook shank and wire to form a broad head; trim neatly. Do not wrap so tightly as to compress the wire toward the hook shank. |
|
|
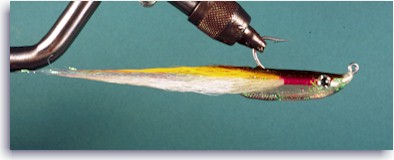
| Step 5: Tie in a sparse amount of dark bucktail (brown in this case), being sure the hair is long enough to reach well past the bend. Make sure to split the hair equally on each side of the hook bend. Now, slightly moisten all the material past the hook bend so it lies down neatly. Be careful not to wet the head flash material as it will prevent the epoxy from sticking properly. |
|
|
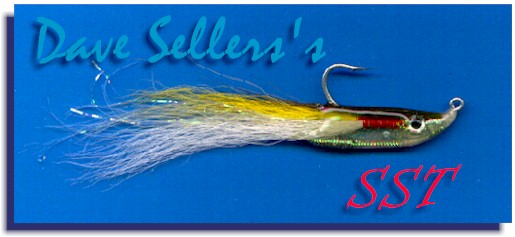
| Step 6: Using Devcon 5-minute epoxy, coat the body area of the fly. Be sure to cover all the lead wire and Mylar piping and work the epoxy thoroughly into the material. Rotate the vise frequently and allow the excess epoxy to drip or be scraped off the belly of the fly. Use a bodkin or a length of wire as a tool to keep the hair in place and to manipulate the epoxy. Once the epoxy begins to set, use saliva or water-moistened fingers to shape the fly. Push the topping down flat and shape the belly. Once the first coat of epoxy is nearly dry but is still tacky, add optics such as 3-D Spirit River eyes and add another thin coat of epoxy over the first coast, covering the eyes. Note: A rattle tube can be inserted between the wire and the hook shank before the head-flash is wrapped if you want a rattling SST. |
|
More comments and tips from Dave Sellers The SST has the benefits of being a hook-up pattern which makes it fairly snagless and virtually eliminates gill or lower jaw hook ups. It is exceptionally durable and is a non- fouling pattern. If, after tying the SST, it does not dart as much as you had hoped, here are a few tips that will enhance its action: First, remember the action is caused by the weight placement behind the hook. If the weight is placed farther behind the bend of the hook than illustrated, the darting movement will be increased. For extreme movement place the lead-wrapped florist's wire so the wraps begin at the bend of the hook and extend back behind the hook. As an option, you can double wrap the lead at the very end to shorten the distance the wire sticks out behind the hook while still insuring the weight stays aft of the bend. Be sure to work the epoxy neatly so that this extension receives two strong, thin coats of epoxy. Another tip for creating unique, random movements in this pattern is to make sure there is buoyancy in the nose of the fly. You can do this by wrapping the crystal flash in the head of the fly close enough to insure that air is trapped in the nose. Or place a piece of foam in the nose of the fly. Cut the foam to neatly fit between the shank of the hook and the florists wire, wrap with crystal flash and then finish the fly as instructed. Finally, the SST can be tied easily on a conventional hook. I prefer the Tiemco 811s 1/0 or 2/0. Use 16 wraps of .035 lead for either hook size. Attach the lead wrapped florist wire just behind the eye by bending a 1/8-inch anchor point on the wire, attach the wire with thread, and then bend wire to shape and continue as instructed.
|
Dan Blanton's Coast to Coast Guides Page
Writing | Slide Shows | Stock Photography | Fly Casting Lessons | Travel/Tackle Consulting | Angling Destinations - Clinics | Tackle and Techniques | What's Hot - Tackle to Fishing | Blanton's Original Flies | HOT Flies | Bulletin Board | Email |Back Home